
 Halloween W'sheets!


Your child has written a whole sentence, but the words seem to run together. Or perhaps the letters are so far apart that one word looks like three. Even when the spelling is correct, uneven spacing can make a child's ideas difficult to read.
Letter spacing and word spacing practice helps children see how letters belong together and where one word ends and the next begins. Start with a clear example, try a short activity and give your child one spacing goal at a time.
What is the difference between letter spacing and word spacing?
Letter spacing is the room between letters within a word. In printed handwriting, letters need enough room to be recognizable while staying close enough to form a word.
Word spacing is the larger gap between one word and the next. This gap helps readers see separate words in a sentence.
A simple reminder is: Keep letters close within a word. Leave a bigger gap between words.
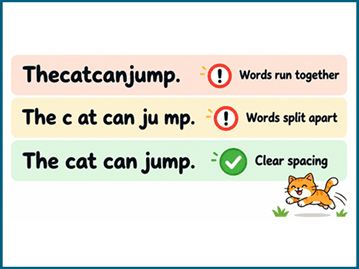
Compare these examples:
Example: Thecatcanjump.
What the reader notices: The words run together.
Example: The c at can ju mp.
What the reader notices: Extra gaps split words apart.
Example: The cat can jump.
What the reader notices: Each word is easy to identify.
Explain that a space is not a missing letter. It is a signal that one word has finished and another is beginning.
Show your child what good spacing looks like
Before asking your child to change their handwriting, demonstrate the difference on paper. Write a short sentence in the same style and approximate letter size your child uses.
Try:
We saw a red bird.
Read the sentence aloud, pointing to each word. Then explain your decisions as you write it again:
“The letters in saw stay together. Now that the word is finished, I leave a bigger gap before a.”
Point out the one-letter words, too. A and I are complete words and need spaces around them when they appear within a sentence.
For beginning printers, a finger space can be a useful starting guide. The aim is a clear gap that suits the size of the writing, rather than an exact measurement. A large adult finger may leave too much space beside small handwriting.
Practice letter spacing within words
If your child separates letters too widely or crowds them together, begin with individual words before moving to sentences.
Build a word, then write it
Write the letters c, a and t on separate small cards. Place the cards close together to make cat. Leave a larger gap and add a picture of a cat or a second word.
Ask, “Which letters belong together?” Then have your child copy cat onto paper, keeping the letters in one group.
Repeat with familiar words such as sun, fish and lamp. Use words your child already knows so that spelling does not become the main challenge.
Find the accidental gap
Write two versions of a familiar word:
• rabbit
• rab bit
Ask your child which version looks like one word. Have them rewrite it, keeping all six letters together.
Explain that a word can have more than one syllable without needing a space inside it. You can clap the parts of rabbit, but it is still one written word.
Use boxes as a temporary guide
For a child who needs a clearer visual boundary, try a short word on squared paper, with one printed letter in each square. Choose squares large enough for comfortable writing.
This is a practice scaffold, not a rule for all handwriting: letters such as i and m naturally have different widths. After a few examples, copy the same word onto ordinary lined paper and look for a readable group of letters.
Practice spaces between words
Once your child can keep a short word together, work on leaving a clear gap before the next word.
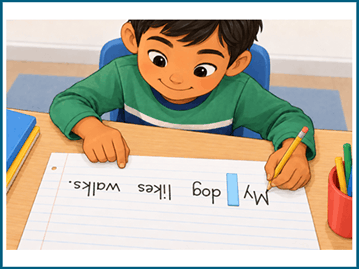
Say the sentence and count the words
Say:
My dog likes walks.
Move a counter for each word: My — dog — likes — walks. There are four words, so there will be three spaces between them.
Ask your child to repeat the sentence before writing it. This helps make the word boundaries clear before they have to think about letter formation.
Choose simple sentences at first. Counting words becomes less straightforward when children are also puzzling over unfamiliar vocabulary or contractions.
Try a finger or spacing tool
Have your child write the first word. They can place a finger from their non-writing hand after it, begin the next word beyond the finger and move the finger away.
If using a finger is awkward or blocks the writing, try a narrow strip of card as a spacing guide. Position it after the completed word, then remove it once the next word has begun.
Keep the tool small enough to suit the handwriting. As your child becomes more confident, ask them to estimate the gap first and check it afterward. Gradually reduce reminders so they can make spaces independently.
Repair a sentence with missing spaces
Write a short sentence without spaces:
Theduckcanswim.
Read it aloud together. Ask your child to draw a small slash where each space belongs:
The/duck/can/swim.
Then have them rewrite the sentence normally:
The duck can swim.
The slashes are editing marks, not part of the finished sentence. Begin with a sentence you supply; later, let your child check one of their own.
Five quick spacing activities to try at home
These activities give children a reason to write while keeping practice manageable. Choose one activity for a short session.
1. Be a spacing detective
Write three versions of a sentence: one without word spaces, one with gaps inside words and one with clear spacing. Ask your child to find the easiest version to read and explain why.
Then let your child write a spacing mistake for you to spot.
2. Build a sentence with word cards
Write one word on each card: The, little, frog, can, hop.
Have your child arrange the cards into a sentence, leaving a visible gap between cards. Read it together, then copy it onto paper. Explain that the handwritten sentence needs gaps between words, just as the cards did.
3. Write a silly sentence
Offer a simple sentence such as:
My duck wears boots.
Ask your child to copy it with clear spaces and draw a picture underneath. On another day, let them choose an animal and something funny it might do.
4. Label a picture
Draw or choose a picture of a playground, kitchen or garden. Have your child add short labels such as red slide, big tree or small bird.
Two-word labels provide word-spacing practice without requiring a full sentence. Ask your child to point to the gap between the two words.
5. Leave someone a note
Invite your child to write a short message:
• Please feed the cat.
• I saved you a cookie.
• Meet me in the garden.
Before delivering it, ask, “Can the reader tell where every word starts and ends?” This gives checking a practical purpose.
Adjust spacing practice for Grades 1–3
Choose a starting point based on what your child can do comfortably. These are suggested activities, rather than fixed milestones.
Grade 1: Focus on keeping familiar words together and leaving clear gaps between words. Have your child copy one short sentence, using a model and a spacing guide if needed.
Grade 2: Practice maintaining spacing across several sentences. Ask your child to write two sentences about a picture, then check that each word is clearly separated.
Grade 3: Encourage your child to use consistent spacing in independent writing. Have them write a short note or paragraph, then review one line for crowded words or gaps that split words apart.
An older child may still benefit from a short model or spacing tool. A younger child who already spaces clearly can move on to writing their own sentences.
Common spacing problems and simple adjustments
The words run together
Return to one short sentence. Say it aloud, count the words and model the gaps. Try a spacing tool for the next sentence, then ask your child to check one sentence without it.
There are large gaps inside words
Practice a few familiar words on their own. Underline each complete word after writing it to show which letters belong together. Then use one of those words in a short sentence.
The spaces are much larger than the writing
Check whether the finger or tool being used is too wide. Model a smaller gap that still makes the words easy to distinguish. Handwriting does not need perfectly identical spaces to be readable.
Spacing becomes less clear near the end of the line
Show your child how to move a whole word to the next line when there is not enough room. For this practice, encourage them to start the word on the next line rather than squeeze it into the margin or split it randomly.
Copied work is clear, but independent writing is crowded
Make the task shorter and let your child say their sentence before writing it. They may find spacing harder to remember while also planning ideas and spelling words. Afterward, review just one sentence together.
A short handwriting routine
Try this five-minute routine, shortening it if your child becomes tired or frustrated:
1. Notice: Look at one clear model and point out the word spaces.
2. Practice together: Write one short sentence with support.
3. Try independently: Have your child write a different sentence.
4. Check: Read it back and look for clear word boundaries.
5. Recognize progress: Name something specific, such as, “You left a clear space after every word in this sentence.”
Focus on spacing during this session rather than correcting every letter, spelling choice and punctuation mark. If there is one crowded gap, help your child revise that part without requiring them to recopy an entire page.
Handwriting worksheets for more practice
For guided word-spacing practice, try K5 Learning's spacing between words worksheets. Use a short exercise to practice leaving gaps, then apply the same habit to a sentence your child chooses.

The trace and write sentences worksheets offer models for copying simple sentences. Ask your child to notice the word spaces before beginning. These worksheet sets currently display membership requirements.

For a broader selection of early printing activities, explore K5's writing letters and words worksheets.
Questions parents ask about handwriting spacing
Should my child put a finger space between every letter?
No. A finger space is a temporary guide for the gap between words. In printed handwriting, the letters within a word should remain close enough to be recognized as a group.
How big should a word space be?
It should be visibly larger than the spaces between letters and suit the size of the handwriting. There is no need to measure every gap. Start with a clear model and adjust a spacing tool if it leaves gaps that are too large or too small.
Does this advice apply to cursive handwriting?
The word-spacing principle does: readers still need to see where words begin and end. However, many letters within cursive words connect. Use a cursive model rather than asking a child to separate each letter as they would in print.
What if reminders do not seem to help?
Ask your child's teacher to look at a writing sample with you. Compare a short copied sentence with independent writing and discuss which support to try next. Keep the discussion focused on making writing comfortable and readable.
Help your child's ideas become easier to read
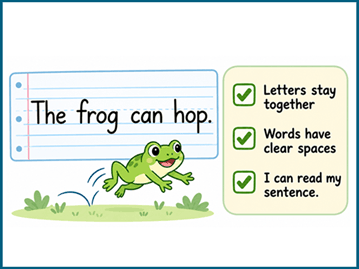
The next time your child writes a note, caption or homework sentence, choose one line to check together. Ask, “Do the letters in each word stay together? Can I see where the next word begins?”
With a clear model and manageable practice, children can work toward spacing that helps readers follow their ideas. Aim for readable writing and growing independence, one sentence at a time.